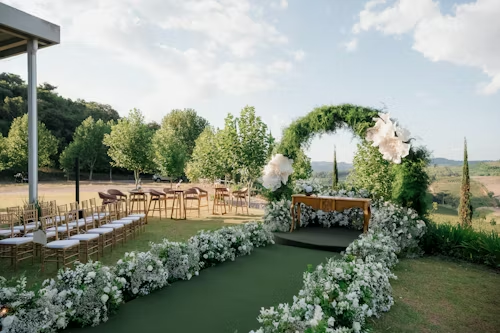
Lasting Property Value Often Begins With a Well-Designed Luxury Townhome
Melbourne’s property market has evolved significantly over the years, with buyers increasingly seeking homes that combine style, convenience, and long-term value. Among the various residential property options available, luxury townhomes have emerged as a popular choice for homeowners and investors alike.
Offering sophisticated designs, premium finishes, and highly desirable locations, luxury townhomes provide an appealing alternative to traditional detached houses and apartment living.
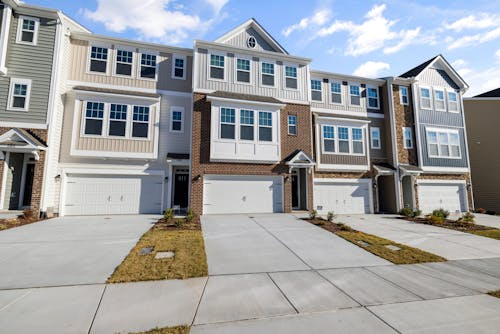
As demand for high-quality residential developments continues to grow, Luxury Townhouse Builders Melbourne are playing an important role in shaping the city’s modern housing landscape. These builders create residences that cater to contemporary lifestyles while maximising functionality, comfort, and visual appeal.
For many buyers, luxury townhomes represent an opportunity to enjoy upscale living without the extensive maintenance often associated with larger properties.
One of the most frequently asked questions by both homeowners and investors is, “Do townhomes have good resale value?” The answer depends on a variety of factors, including location, design quality, market conditions, and construction standards.
However, in many cases, well-designed luxury townhomes can achieve strong resale performance and remain highly attractive to future buyers. Understanding the factors that influence resale value can help property owners make informed decisions and maximise the long-term potential of their investment.
Understanding the Growing Appeal of Luxury Townhomes
Luxury townhomes have become increasingly popular throughout Melbourne because they offer a unique combination of convenience, style, and practicality. As land prices continue to rise and urban density increases, many buyers are seeking housing options that provide modern living spaces without sacrificing quality.
Unlike standard townhouse developments, luxury townhomes focus on premium design, superior craftsmanship, and high-end features. These properties often incorporate spacious layouts, sophisticated finishes, energy-efficient technologies, and architectural elements that enhance both functionality and aesthetics.
The growing appeal of luxury townhomes has contributed to strong buyer demand in many Melbourne suburbs, supporting their long-term market performance.
What Defines a Luxury Townhome?
A luxury townhome is typically distinguished by its quality of construction, level of finish, and overall design sophistication. These homes often feature premium materials, custom cabinetry, designer kitchens, advanced technology systems, and carefully planned living spaces.
In addition to interior features, luxury townhomes frequently occupy desirable locations close to amenities, transport networks, and lifestyle attractions. This combination of quality and convenience enhances their appeal among a broad range of buyers.
The emphasis on craftsmanship and attention to detail often sets luxury townhomes apart from standard residential developments.
Why Buyers Are Choosing Luxury Townhomes
Many buyers are attracted to luxury townhomes because they offer a balance between spacious living and manageable maintenance requirements. Unlike large detached homes, townhomes often require less upkeep while still providing multiple bedrooms, outdoor areas, and modern amenities.
This appeal extends to professionals, families, downsizers, and investors who value convenience without compromising on quality. As lifestyle preferences continue to evolve, luxury townhomes are increasingly viewed as practical and desirable housing solutions.
Their versatility contributes significantly to their popularity within Melbourne’s property market.
Do Townhomes Have Good Resale Value?
In many cases, townhomes can achieve strong resale value, particularly when they are located in desirable suburbs and built to a high standard. While market performance can vary, well-designed townhomes often attract considerable interest from future buyers because they offer a combination of affordability, functionality, and lifestyle benefits.
Luxury townhomes tend to perform especially well because they appeal to buyers seeking premium living environments. Features such as modern architecture, quality finishes, and convenient locations often contribute to stronger resale demand.
However, resale value is influenced by multiple factors, making it important to understand what drives long-term property performance.
Why Resale Value Matters
Resale value represents the potential return a homeowner or investor may achieve when selling a property in the future. Strong resale value can contribute to wealth creation and provide greater financial flexibility.
Understanding resale potential before purchasing or building a townhome helps ensure that decisions align with long-term goals. Factors such as location, quality, and market demand all play important roles in determining future value.
Properties with strong resale appeal often remain attractive even during changing market conditions.
The Relationship Between Demand and Value
Property values are heavily influenced by buyer demand. When a particular type of housing is sought after by a large number of buyers, its market value tends to remain strong or increase over time.
Luxury townhomes often benefit from consistent demand because they appeal to multiple buyer groups. Their combination of space, convenience, and premium features creates broad market interest.
Sustained demand is one of the key reasons many luxury townhomes achieve favourable resale outcomes.
Location Remains One of the Most Important Factors
Location is frequently described as the most important factor in real estate, and this principle applies strongly to luxury townhomes. Even the most impressive property may struggle to achieve maximum resale value if it is situated in an undesirable area.
Melbourne offers numerous locations that support strong property performance due to their amenities, infrastructure, and lifestyle appeal. Choosing the right location can significantly influence future resale opportunities.
A well-positioned townhome often enjoys stronger buyer demand and greater long-term value growth.
Access to Amenities and Services
Townhomes located near schools, shopping centres, healthcare facilities, public transport, and recreational spaces often attract greater buyer interest. Convenience remains a major priority for many homebuyers.
Properties that reduce commuting times and provide easy access to everyday necessities are generally viewed more favourably in the marketplace. These advantages contribute directly to resale appeal.
Proximity to essential services often supports stronger property values over time.
The Influence of Neighbourhood Reputation
A suburb’s reputation can have a significant impact on property demand. Areas known for quality schools, attractive streetscapes, low crime rates, and strong community engagement often experience greater buyer interest.
Luxury townhomes located within highly regarded neighbourhoods typically benefit from this positive perception. Buyers are often willing to pay a premium for properties situated in desirable locations.
Neighbourhood quality remains a powerful driver of long-term property value.
The Importance of Quality Construction
Construction quality plays a crucial role in determining how a property performs over time. A well-built townhome not only provides a better living experience but also maintains its appeal to future buyers.
Luxury townhouse builders in Melbourne focus on delivering high standards of workmanship and attention to detail. These qualities can significantly influence both immediate market appeal and long-term resale value.
Investing in quality construction often produces lasting benefits.
Durable Materials and Superior Workmanship
High-quality materials contribute to a property’s durability, appearance, and maintenance requirements. Buyers often recognise the value of homes that have been built using premium products and skilled craftsmanship.
Superior workmanship helps minimise defects and reduces the likelihood of costly repairs. This reliability can make a property more attractive to prospective purchasers.
Durability is a key factor supporting long-term value retention.
The Impact of Builder Reputation
The reputation of the builder can also influence resale value. Homes constructed by respected builders often inspire greater confidence among buyers because they are associated with quality and reliability.
Luxury townhouse builders with strong track records frequently create properties that stand out in competitive markets. Their reputation can become an additional selling point during future transactions.
Trust and credibility often enhance market appeal.
Design Features That Improve Resale Potential
Modern buyers have specific expectations regarding layout, functionality, and aesthetics. Townhomes that align with these preferences are often better positioned to achieve strong resale results.
Thoughtful design contributes to both livability and marketability. Properties that feel spacious, practical, and visually appealing tend to attract broader buyer interest.
Design quality remains an important factor in long-term value performance.
Open-Plan Living and Functional Layouts
Open-plan living spaces continue to be highly desirable among modern buyers. These layouts create a sense of openness while supporting flexible living arrangements.
Functional floor plans also improve usability by ensuring that rooms are well-connected and efficiently organised. Buyers often place significant value on homes that maximise available space effectively.
Good design can have a lasting impact on buyer satisfaction.
Energy Efficiency and Modern Features
Energy-efficient homes are becoming increasingly attractive as homeowners seek to reduce utility costs and minimise environmental impact. Features such as high-performance insulation, energy-efficient windows, and smart home technology can enhance market appeal.
Many luxury townhomes incorporate these elements as standard inclusions. Buyers often view such features as valuable additions that improve comfort and long-term affordability.
Modern innovations contribute positively to resale potential.
How Market Trends Affect Townhome Resale Value
Property markets are influenced by economic conditions, demographic changes, and buyer preferences. Understanding these broader trends can provide insight into the future performance of townhome investments.
Although no investment is entirely risk-free, properties that align with long-term market trends often enjoy stronger demand and value growth.
Monitoring market conditions helps homeowners make informed decisions.
Population Growth and Housing Demand
Melbourne’s ongoing population growth continues to increase demand for housing. As more people seek accommodation close to employment centres and amenities, townhomes remain an attractive option.
Their ability to provide quality housing in established urban areas supports long-term demand. Increased housing needs often contribute to stronger resale opportunities.
Population growth remains a key driver of residential property markets.
Changing Lifestyle Preferences
Many modern buyers prioritise convenience, accessibility, and low-maintenance living. Luxury townhomes often align closely with these preferences by offering practical living spaces in desirable locations.
As these lifestyle trends continue, demand for high-quality townhome developments is likely to remain strong. Understanding buyer preferences helps explain why many townhomes perform well in the resale market.
Lifestyle considerations increasingly influence purchasing decisions.
Why Luxury Townhouse Builders Melbourne Add Value
The expertise of luxury townhouse builders extends beyond construction. Their ability to create homes that meet market expectations can significantly influence long-term property performance.
Builders who understand design trends, buyer preferences, and construction quality contribute directly to the creation of valuable residential assets.
Professional expertise often plays a major role in determining resale success.
Creating Timeless Architectural Designs
Timeless design helps properties remain attractive even as trends change. Luxury builders often focus on creating homes that balance contemporary appeal with enduring style.
This approach can improve long-term marketability and reduce the risk of properties feeling outdated. Buyers are often drawn to homes that maintain their relevance over time.
Timeless architecture supports sustained buyer interest.
Maximising Functionality and Comfort
Luxury builders understand the importance of creating spaces that are both beautiful and practical. Features such as ample storage, flexible living areas, and quality finishes enhance everyday comfort.
Homes that provide exceptional functionality often perform well in the resale market because they appeal to a broad audience. Comfort and convenience remain important considerations for buyers.
Thoughtful design contributes significantly to long-term value.
Common Factors That Can Reduce Resale Value
While many luxury townhomes achieve strong resale results, certain issues can negatively affect property performance. Understanding these risks helps homeowners make more informed decisions during the planning and ownership stages.
Preventing common problems is often easier than addressing them later.
Awareness supports better long-term outcomes.
Poor Construction Quality
Construction defects, low-quality materials, and inadequate workmanship can reduce buyer confidence and negatively impact resale value. Prospective purchasers often identify these issues during inspections.
Maintaining high construction standards helps preserve both market appeal and financial performance. Quality should always remain a priority.
Well-built homes generally perform better over time.
Unfavourable Locations
Even high-quality properties may struggle if they are located in areas with limited amenities, poor infrastructure, or weak buyer demand. Location continues to be one of the most influential factors affecting resale value.
Careful site selection is therefore essential when planning a luxury townhouse development. Choosing the right location can significantly improve future opportunities.
Location remains a critical investment consideration.
Frequently Asked Questions
Do townhomes have good resale value?
Yes, many townhomes have strong resale value, particularly when they are located in desirable areas, built to a high standard, and designed to meet modern buyer preferences.
Are luxury townhomes a good investment in Melbourne?
Luxury townhomes can be an excellent investment because they often attract strong buyer demand, offer premium living environments, and benefit from long-term growth potential in desirable locations.
How can I improve the resale value of my townhome?
Focusing on quality construction, modern design, energy efficiency, and choosing a desirable location can all contribute to stronger resale performance and increased buyer appeal.
Conclusion
Luxury townhomes have become an increasingly important part of Melbourne’s residential property market, offering a compelling combination of convenience, style, and investment potential. Their appeal to a broad range of buyers contributes to strong demand, which often supports favourable resale outcomes.
While no property investment is guaranteed, many well-designed townhomes achieve impressive long-term value growth.
Working with experienced luxury townhouse builders in Melbourne can further enhance resale potential by ensuring that properties are built to exceptional standards and aligned with market expectations. By prioritising quality, location, and thoughtful design, homeowners and investors can create townhomes that remain attractive to future buyers and continue delivering value for years to come.